Sunday, July 31, 2011

Christmas in July Layout

Well hello and a happy Saturday late night (this will end up on a Sunday morning post) to you all. It has been really crazy here. My computer wireless box fried itself and I had to go and get a new one. Not fun at all since I know nothing of this stuff and hubby is away at work. Well I got one and yes, I finally got it conected. YEAH!!!! Well I can plug wires into the slots on the back of the box. LOL Well enough of the girl who is not computer techy at all.
My layout today was inspired by everyone doing Christmas in July hops. Since it is the last day of July in a very few minutes. I thought today I'd better get something Christmas like done. Well I will admit I didn't use my Cricut at all. WOW!!!! I used paper piecing patterns I had from years ago and cut each of the pieces out by hand. Not so sure I will be doing that again. LOL I forgot how hard it was to do that. What did we all do with out our Cricut cutters and other cutting machines. Well on to the project and enough with the small talk.

Merry Christmas Layout:


I didn't add photo mats, cause I figured I would see if my photos needed them or not.


This is page one and I made Santa's bag a Journaling box for this page and figured I would arrange 2 pics around the bag.
  

The Steet Light I added white gel pen dots to give a little character to it. I also added Yellow Stickles to the light part to make it look like the light was on. The Tree, I use a gold gel pen for the garland, Pearl Pens for the orniments and the snow on the edge of the tree. I added Diamond Stickles to the snow on the whole layout to give some sparkle to the snow.


The Title is from a Dimensional Sticker pack that was purchased at Walmart at least 2 year to 3 years ago. I thought that the snow flakes on the sides went well with the snowflake pattern paper from Leaving Prints.


I added his eyes, nose and mouth with a black and red gel pen. I used the black and white gel pens to make the buttons on Santa's coat. Also used the white gel pen for some dots on his boots to help them look better. There is Glossy Accents added to the Boots, Top of Santa's Bag, and his Eyes, also Diamond Stickles to the White parts of Santa's Coat and Hat.


This is page 2 of the layout. The house/garage has a mat that can be used as a photo mat is I wanted, but I wanted it for Journaling.


There is Yellow Stickles added all over the yellow part of the Star. This Star can also be used either as a photo mat or a journaling box.


This cute little Snowman is also from the sticker pack that was purchased at Walmart. I though he was just to darn cute!!!


This Title was from the same Walmart sticker pack. I used it to show that Santa had already been to our house. :-)


The house was lined with a black gel pen to make it look like wood panels. The snow on the roof has Diamond Stickles on all of the white pieces. The Wreath was glittered with Diamond Stickles, with the berries being made with a Red Pearl Pen.

Well that is the Christmas in July project. I do hope you like it and I really love hearing anything thing you have to say. It is always a joy to read everyones comments. Well hope you have a wonderfully blessed Sunday.

Friday, July 29, 2011

Precious Moments Layout

TGIF to you all!!! Yes it is finally Friday!!! The weekend is almost upon us all. This is going to be a quite and peaceful weekend for me for a change. I figure, I will get some more projects planned and ready to put together and just enjoy the I don't have nothing planned. LOL Well enough about my lazy weekend to come.

Precious Moments:


Sorry don't know who the manufacturer of the pattern papers is for these papers. The cardstock is by CTMH. I inked the photo mats, small oval scallop punches, the oval green popka dot paper, and the velum titles


I used 2 differnt pieces of ribbon from my stash a chocolate 1" wide and the cream ribbon is 1/2" wide.


I added 3 of these roses to each page. I got these from a friend, who gets them from a company called "I am Roses". I think that added the right feel to the layout.


The saying I tried to cut in an oval (didn't do very good at the oval. I didn't have my oval cutter) out of the velum to match the Green pattern paper oval. I inked the edges of both pieces. Didn't have in vellum tape, so I used my ATG under the large capped words to hide the tape.


Here is a up close of one of the roses that my friend gave me. It really matched the paper, ribbon and the ink edges of the dies. Used VersaMagic Jumbo Java Chalk Ink to ink the edges.

Well hope that you all liked my simple and slightly elegant layout. Thank you for hopping over and I truly love to hear from you all. God bless and keep you all well.

Thursday, July 28, 2011

All Aboard Layot

Welcome and we are getting to the weekend fast. YIPE!!! It is very hot here in Cental California and I am crossing my fingers that the rest of you are having better than us here. I have a layout today that should make you think of the Ocean and the nice breezes that are out there on the Ocean.

All Aboard:


The background paper is from Leaving Prints and the cardstock is from Picture Perfect. I know still getting through the tons of old stuff I have. 


My family and I took a cruise to Mexico back in 2009 and I never finished scrappin all the photos, so now is the time. LOL


The die cuts are from We R Memory Keepers - Embossed Designs - All Aboard. I didn't ink any of the edges, cause I like the crisp edges that the white had.

Well another quick, but I think cute layout. I hope that your week is going well and the rest is bright. Come back tomorrow to see a layout on those special moments.


Wednesday, July 27, 2011

By the Sea Layout

Good morning and happy hump day to you all. Yes, it is Wednesday and we are almost through 1/2 of the work week. YEAH!!!. I have a layout today that makes me think of cool things. Which with the heat is much needed.

By the Sea:


The background paper is vintage CTMH paper from about 10 years ago. I know old, but at least I am trying to use up the old stuff. The card stock is Picture Perfect, also old. LOL


Used very few die cuts on this layout, cause I didn't want to take away from the pictures I will be using on these pages.


The die cuts are from We R Memory Keepers - Embossed Designs - By the Sea. It is dated 2003, so yes it is also very old as well. But I am giving myself credit to at least to be using it and not buying more.

Well that is my simple layout for today, come back tomorrow as we go out to sea. Have a wonderful rest of your week.

Tuesday, July 26, 2011

Buddies Layout

Well good morning and a happy Tuesday to you all. The week is moving along and temperature is raising. Us here in Central California will be looking at 3 digit temps starting on Wednesday. I hope that the rest of you will be cooler. Well enough of the weather an on with my layout.

Buddies:


The background paper is from Leaving Prints and is very much a vintage paper. The cardstock is from Picture Perfect and is also from a time ago.


The Title on each page are from We R Memory Keepers - Embossed Designs - Best Friends


I used 2 sizes of Scalloped Circle punches, 2 sizes of Scalloped Oval punch, 1 Oval punch, 1 1/2 inch Circle punch and the Five Petal Flower punch from Stampin Up. I used a white gel pen to place some pen marks all around the Scalloped punches. It made them pop a bit more.

This would have been a quick layout if it wasn't for all the punching of the 5 Pedal Flowers I had to punch and put together.  Well I hope you enjoyed my creations for today. I will have several more for each day this week, so be sure to hope over to see. Have a great rest of your week.

Monday, July 25, 2011

Snow Days Quickie

Hello and good afternoon all. Hope your Monday is going well. I did a really quick 5 minute LO (well to be honest about 10 minutes), that I was challenging myself to not take forever deciding what papers to go with the die cuts that I had. So this is what you call a really simple layout.

Snow Days:


The background paper is from My Minds Eye, but from at least 5 to 8 years ago. I know it is really bad to have things stashed away for that long. Well I am trying very hard to go through and clean up my stash.


The Green and Blue/Violet textured cardstock I believe is from DCWV. I am not sure, cause I have pulled from my huge stock of cardstock. 


I tore the Green cardstock to make it look like the ground. I think I will be going back and adding something to make like snow on the top of the Green.

Well this was my really quick and not really finished layout. Hope you got a kick out of the vintage pattern paper. Have a blessed rest of your week.

Quick & Simple LO

Hi and happy Monday to you all. I am sorry that my post for Saturday never posted. Not sure what I or blogger did wrong, but I will post now.

Family Ties:


The background paper is from My Minds Eye and the cardstock is from Stampin Up and CTMH.


The die cuts are from We R Memory Keepers, Heritage Embossed Designs. Loved the little crochet flower, it almost looks like the real deal.


Another view of the Embossible Dies.


Behind the Crochet Flower Die, I added 2 different size Scallops punhes from Stampin Up. I also used a pin and put holes in each of the scallop edges.

Well I hope you like my single page layout today. It is a very quick and easy layout to put together. Have a wonderful week.

Friday, July 22, 2011

Heirloom Layout

Good morning all, hope you had a restfull night. The sun is shining here and I hope it is where you are as well. Today, I am show casing a Heritage layout that I made. I still haven't figured out the pictures as of yet, but I will. LOL

Heirloom Layout:


The background paper is from My Minds Eye paper stack Bella Bella. I liked the added element of the bird on the flower bush to my layout.


The die cute elements used are from We R Memory Keepers - Embossibles Designs - Heritage - Olive 12 x 12 sheet. I inked all the edges of the die cuts and the photo mats (except for the black mat) with VersaMagic - Jumbo Java - Chalk Ink.


Each of the die cut elements (except for the 2 tags) are pop dotted up for dimension. I use Picture Perfect Cardstock for the photo mats, using 3 layers (black, craft, and cream). Also added some fibers to both the tags to give a different look than a brad.

Well I hope you liked my project of the day. Come back tomorrow for another one of my using my stash creations. TGIF and have a blessed day.

Thursday, July 21, 2011

Summer Fun Blog Candy by Scrapbooking for Fun

Well WOW!!! Another fantastic Blog Candy Giveaway. Scrapbooking for Fun is having a Summer Fun Blog Candy event. She is working on getting 300 followers and she is already over 1/2 way there. Just look at some of the great candy she is offering.


You can enter to win 3 different times and here are the ways:
#1 Become a new follower on Scrapbooking for Fun's blog and leave a comment on this post telling me you are a new follower. You must be a follower on my blog to win. Already a follower? There are 2 other ways to enter!! :)


#2 To enter again share this post on your facebook page and leave a comment on the same post telling her you have done that.


#3 Blog about this and leave me a comment on the same post telling her you have done that!


That means you can enter 3 times!!!


Now for the good stuff!! A list of what is in this yummy package:


#1 Echo Park Summer Days scrapbook kit which includes all 10 sheets of print double sided cardstock and 2 sticker sheets!! This is the same products in the 12x12 kit it is just not in Tablet form!


#2 Cuttlebug Carnation Die and quilling kit


#3 Kaisercraft Flutterbys and a 6 pack card and envelope set.


#4 3 packages of Felt Fusion pink heart, lime green floral and white floral


#5 1 package of chipboard alphabet.


#6 2 packages of flowers. Maya road felt flowers and my moments mini roses in yellow.


#7 1 yard of red rose ribbon. 2 feet of red ribbon and 2 feet of a bright cheerful summer ribbon.


Now is this not an awesome giveaway???? Well have a great Friday and wonderful weekend.

"The Heat Is On" - Blog Giveaway!!

Good afternoon all, I hope that your Thursday has been a bright one. I wanted to let you know about a fantastic Blog Giveaway over at Raina's Favorite Crafty Things. She is going to be giving away one of the 2 following Cricut Cartridges when she hits 350 followers.


So you really need to hop over to Raina's Favorite Crafty Things blog and become a follower, leave a comment then place this on your blog.

May you have a Blessed day.

Best Friends

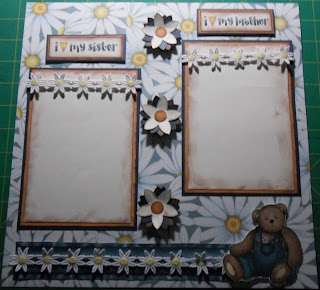
Well it is Thursday. We made it over the hump of the week. I do hope you all are having a great week. So today I am posting a layout that I made that will have a picture of all three of my children. Page 2 will have a picture of my little one with her sister and another picture with her brother.


The background paper is from Leaving Prints from the year 2006. The Die Cuts are from The Beary Patch called the Denim Frame & Strips #049 dated 2002. The cardstock is from Picture Perfect.


The photo mat is for a 5x7 with the cream piece being 5 1/4 x 7 1/4 then up 1/4 inch for each layer. The Journaling Boxes are each 2 1/2 x 4 1/2. I inked each of the boxes with Versa Magic Jumbo Java Chalk ink. The Teddy Bear and the Title are both popped up with Pop Dots.


The photo mats here are for 4 x 6 pictures with the cream being 4 1/4 x 6 1/4 then up 1/4 inch for each layer after. I found some of this Daisy Trim in my stash and added it to the bottom of the border and to the top of each picture mat. The Teddy Bear and the 2 Titles are all popped up using Pop Dots.


These flower were made using the 5 Petal Flower punch and the 1/2 Circle Punch for the centers The punches are from Stampin Up. I inked the edges of all the layers and used glue dots to adhere them. I folded up the ends of all the layers to give a little more pop than just using the Pop Dots.

Well I hope you liked my layout for today. I only used items that I had in my stash. I also used alot of the scraps to make the Flowers.  Thank you for hopping over and I love to hear from you. God Bless and have a great rest of the week.

Wednesday, July 20, 2011

Scrappin' For Kenzie 100 Follower Giveaway

You really need to come check out this giveaway. It is mega big and the goodies all look so yummy. So hop over to Scrappin' For Kenzie blog and join in for a chance to win. Just click on the Blue.

Here a pic just to tempt you:


God Bless you all and hope you are having a Scrap-A-Licous week.

Monday, July 18, 2011

Halloween in July

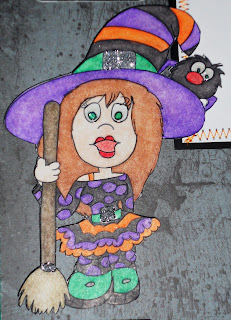
Well I have been MIA for a couple of day to celebrate and to get some major yard work done around my house. Well it is done and now it is on to creating. YEAH!!! So here we go with fun stuff. I got a chance to work with some really fantastic digi stamps by Jen's Digi Stamps and I love them, love them and love them. I had such fun coloring in these 3 wonderful Halloween digi stamps, that instead of a card I put together a layout.

So what do you think of Halloween Spooks:


The background paper I used is from Around the Block called Haunty, dated 2006. This was one from my stash of old papers that I have.


The top and bottom borders are from SEI borders called Spooks. The small title is from a box of die  cuts that I have had for yearsssssssssss. LOL So no names on that. The Twinchies are some I made for a swap back a couple of years ago on the Cricut Board. I had a fun time making these on my Design Studio.


The Journaling Box and the Inchies are also from a swap back in 2005. Unfortunately the person who did these didn't label the back so I could give credit. I loved the little Spooky and Web Stamp on them. The Cat was a punch.


This is the 1st of the Digi's from Jen's Digi Stamps and he is just to adorable. Those eyes just call to you. I added Glossy Accents to the eyes to give even more of a dramatic effect.


This little guy was just calling to be placed on my layout. He just had that look that you can't refuse me extra candy look. LOL All the images are colored using the Prisma Color Pencils with Mineral Spirits to blend them.

This one just said I have an attitude and reminded me of my little one and said "I am just plain perfect!". So this one will be next to a pic of my little one, who thinks she is all that. LOL I added Glossy Accents to her and the spiders eyes to give them a bit of pop. Also, added some Studio G, Sparkle Writer in Silver to the belt buckle, hat buckle and the band on the broom.

Well I do hope you liked my Halloween in July project. Halloween is my families favorite time of the year. We love the decorations and the costumes are so much fun. Plus Fall is just to me the prettiest of all the seasons with its many colors of the earth.

Well hope you all have a fabulous week. Love to hear from you all.

Thursday, July 14, 2011

Ouch!!!!

Well tomorrow is TGIF!!!! It is also my 48th B-day. YIKES!!! I am getting old. LOL Well because it feels like being kicked in the shin when the children say you are OLD, I made a layout called OUCH. Cause that is the way I felt when one of my friends kids said you are so old..... So this is what I came up with for a event in my youngest life that was wild. She broke her arm in March when she was 3 by going to the bathroom in the middle of the night and falling asleep on the toilet. She proceed to fall into the bathtub and hit her elbow in just the right place. Well to add to that, 3 1/2 weeks later she thought she could jump like a frog and tried to jump from the couch over the coffee table. Well she missed the mark and hit the edge of the coffee table with her head, so stiches. The to put the icing on the cake she decided that she couldn't jump from the couch to the table, she would try the bed to the floor. Lets just say she didn't see the dresser in front of the bed and jumped to far and landed up against the dresser causing it to fall on her. I was thinking that the hospital was going to call the police and I was going to go to jail for child abuse. I had the same Doctor the casted her arm the first time, do the second cast and he just laughed. My daughter proceeded in telling the Doctor that she was going to be a Dare Devil. Thank goodness she could talk. LOL

Well here is my project:


The true color of the background paper is an Army Green. My camera wouldn't take a good color picture.


I didn't ink any of the items cause it just looked good without the ink.


The Doctors Scrubs almost totally match the background paper.

The items used are Cardstock is all from Picture Perfect, and We R Memory Keeps, Embossable Designs, Ouch. I added nothing else and it was one of the quickest layouts I have ever done.

Well hope you all had a wonderful week and that you weekend will be relaxing and enjoyable.